After watching HGTV's
Bang with a Buck recently, my husband and I decided to do a DIY project in our kitchen. Actually, only one of us did this project. (I just helped out however I could.) Unfortunately, I'm not one of those wonderful bloggers who can wield their trusty hammers or paint brushes. Not even a little bit! But I do come up with ideas from time to time and Dave will usually say, "I think I could do that."
In our first home, my husband and father-in-law built the most beautiful white pergola off of our back patio - totally from my husband's design sketches and my father-in-law's building expertise. I think he could pretty much do any job he put his mind to do. He is a pastor by day, but I think he could be a contractor on the side.
So, my husband and I went to Lowe's and picked out tumbled marble tiles and all the things we ( uh-hum, I meant "he" ) would need for the job.
We decided we liked the tiles laid on the diagonal and so the job began.
Here is a "before" photo. We have granite countertops in the kitchen and antique white cabinetry. The wall color is "Restrained Gold" from Sherwin Williams.
This is my husband, Dave, hard at work.
Things were going along very well until it came to THE GROUT. We both stood in the aisle at Home Depot looking at all the colors of grout there were to choose from. We agreed on a color and brought it home. Dave began adding the grout until....
We both decided it was the
wrong color!
The problem is that Dave had gotten pretty fast by this point. If you've ever done a kitchen tile backsplash, you know that you can't stand up and work. You have to crouch the whole time since you are working under the cabinetry. It was starting to take a toll on his back, so he was working quick and had gotten a lot of the grout work done on one whole wall.
But as we stood back and looked at it, we both thought the same thing. It was just too dark.
We decided to try and dig out the grout. Easier said than done! We both worked and worked on it, but decided the grout had also discolored many of the tiles making them darker than the original.
Dave made the decision to remove the tiles he had put up on one wall. As he began popping out tiles, we made another discovery. Some of the tiles came off fairly easily. But other tiles came off with chunks of the wall attached. I sat down at the computer and googled "how to remove tiles without removing the wall"....(here's where my help came in - ha!) Some of the sites said, "Forget it. There is no way around it. The wall will come off with the tile." But then I found a helpful tip. It said to aim a blow dryer at the tiles. I ran upstairs and retrieved my blow dryer and started working. Sure enough, it did cause many of the tiles to pop right off. But some of the tiles were more stubborn and were still taking off the wall with it.
We debated. What should we do? Our littlest boy said, "Mom, we should pray about this." We did and then heard the phone ring. It was our dear friend, Quinby Collier. After a few minutes of conversation, he headed over to help.
In the meantime, Dave made the decision. He was going to have to remove the tiles and
then also put up new drywall on that wall. The two other walls were safe since they had no grout on them yet.
Ugh! A job that had been moving speedily along now came to a grinding halt. Thankfully, Quinby was available to help that afternoon and knew how to cut and install drywall.
I know! We still can't believe it either! My beautiful kitchen...but it gets better! There will be a happy ending, friends.
Once the decision was made to actually do it, the two men worked fast. You know the old saying, "Many hands make fast work." Both Dave and Quinby are hard workers as well as perfectionists. So, I knew the end results would be great, but I felt so badly for Dave. He was using up his vacation days for this "project from..." well, you know the rest.
But here is the final reveal.
Remember the before?
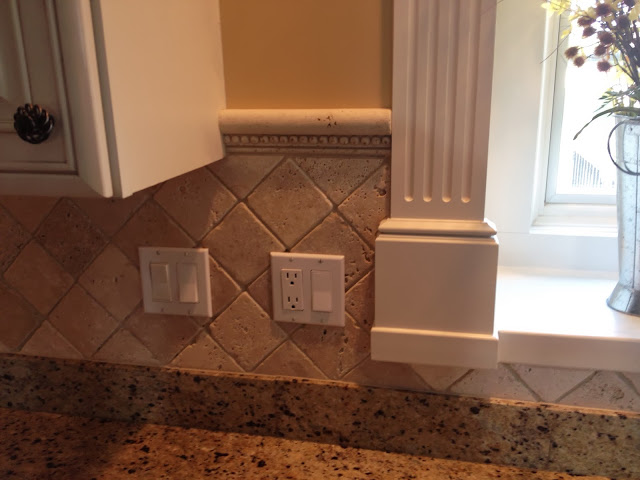
The after.
Here are a few more "afters".
.JPG) |
| Close-up |
It looks so beautiful now. You'd never guess what he had to go through to "right the wrong". I'm thrilled with how it looks. It reflects the light so beautifully and seems to finish the kitchen out.
If you ever decide to tile, test out your grout before you put it on the wall. It would be good to do a "mock up" of the tile on a board and see what you think before you ever put it up on the wall.
It may sound crazy, and we burned up a lot of vacation days, but in some weird way it was sort of an enjoyable experience - working together in the kitchen through the good and the bad.
Didn't he do a great job? And...thank God for good friends!
Linking up to:
homestoriesatoz.com  www.savvysouthernstyle.net astrollthroughlife.net
  stonegableblog.com impartinggrace.com frenchcountrycottage.blogspot.com beneathmyheart.net
bystephanielynn.com virginiasweetpea.com kellyskornerblog.com


.JPG)

.JPG)
.JPG)
.JPG)
.JPG)


.JPG)
.JPG)
.JPG)

